/prod01/fit-cdn-pxl/media/fit-website/site-assets/images/FT-Horiz_crimson-gold.png)
/prod01/fit-cdn-pxl/media/header-images/olin-quad.jpg)
Benefit Job Aids
Add and Edit Beneficiary Information
Overview
Beneficiaries can be added through a benefit event, or they can be added/edited independently at any time. Below are two different sets of steps: Adding a new beneficiary and Editing an Existing beneficiary.
Steps to add a NEW Beneficiary
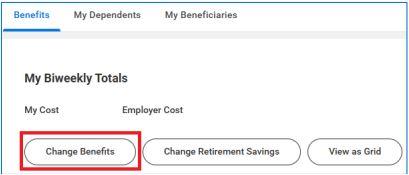
1. Navigate to your employee profile by clicking on your picture at the top right corner > View Profile.
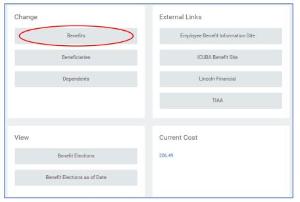
2. In the Blue section to the left, click on the Benefits section.
3. Select the Change Benefits button on the Benefits screen.
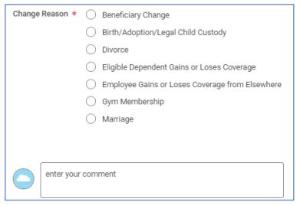
4. Select Beneficiary Change for the Change Reason

5. The effective date would be the date your are making this change > Submit.
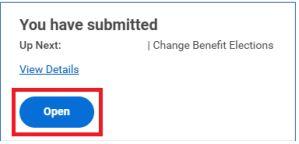
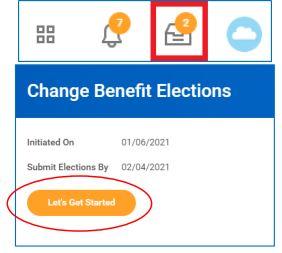
6. A pop-up will appear click Open, or you can go to your Inbox to open the task there.
7. Click "Let's Get Started" on the task.
8. Click on the Manage link in one of the benefit boxes
9. Click through the benefit by selecting Confirm and Continue at the bottom of the screen. You can add or adjust current beneficiaries on the second screen.
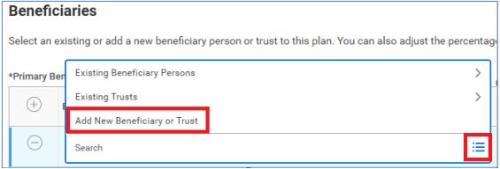
10. To add a New beneficiary, click on the + button in the Beneficiary box to add a new line, then click on the three lines to the right side of the new box

11. Select Add New Beneficiary or Trust, as this will be the first time you are adding someone; once you add their information, you can add them to other benefits by using the Existing Beneficiary option.
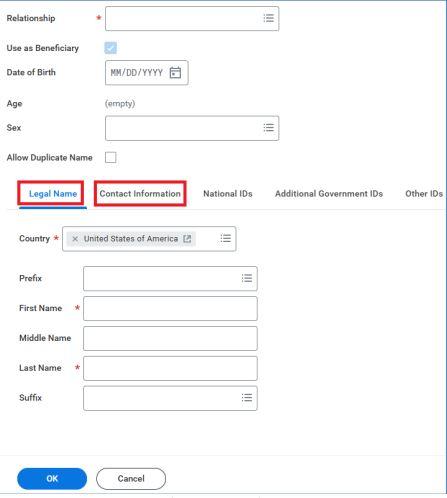
12. The required fields are Relationship, Country (US only), First Name, Last Name. You must also click on Contact Information and provide an address. The more information you provide, the easier it is to locate the person in the event of your death.
13. Once you have saved their information, you'll see them show up on the Beneficiary line. You'll need to add a percentage to that person. You can have 100% going to one person or you can add more beneficiaries by clicking on the + button and going through the process again. The total percentages must equal 100%.
14. Second Beneficiaries are not required but you add them if you like. These are people who would get the benefit if your Primary Beneficiaries are no longer alive.
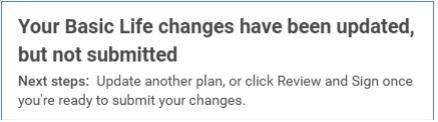
15. Once you click Save, your changes have now been updated but not submitted. You'll need to go into the remaining Life and AD&D benefit boxees and add beneficiaries to those benefits as well. You will not have to add the person's information again as they will coe up as options under Existing Beneficiary.
16. Once you have added beneficiaries to each of the benefits, click on the Review and Sign at the bottom of the screen.
17. The View Summary page will appear, and it'll show all your beneficiaries listed for each of the benefits. You'll scroll down to the bottom, check the "I Accept" box, and then Submit. No attachments are needed for beneficiaries.
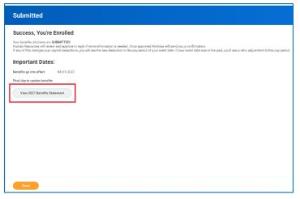
18. The Submitted screen will appear, and you can Click on "View Benefit Statement" to print a copy for your records or just click Done. This completes the process.
Steps to Edit an Existing Beneficiary
1. Navigate to your employee profile by clicking on your picture at the top right corner > View Profile.
2. In the Blue section to your left, click on the Benefits section.
3. Click on the My Beneficiaries tab.
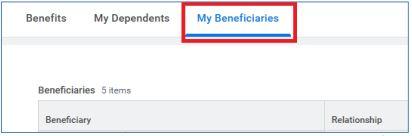
4. Next to each person's name there will be an Edit button to the far right. Click on the button to change someone's information, such as Last Name, Phone Number, and Address.
5. Once you are in the Beneficiaries information profile, you'll click on the pencil icon for any section you need to edit.
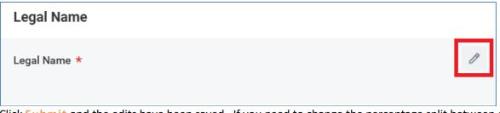
6. Click Submit and the edits have been saved. If you need to change the percentage split between existing beneficiaries, that is done through the Change Benefit process in the first part of this job aid.
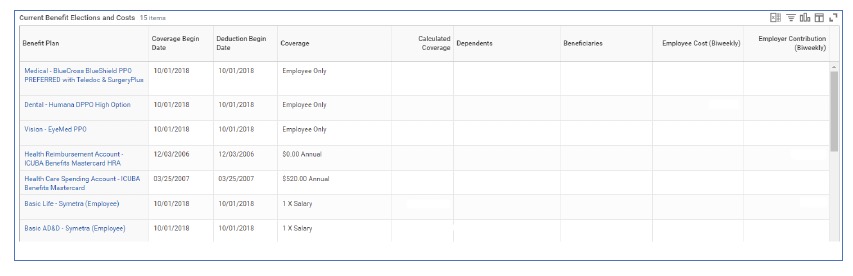
View your Benefits
Benefits, Dependents, and Beneficiaries will be setup, elected, and tracked in Workday.
- Select the Benefits Application from Home Page
- Select the desired link to view (or change information), current Employee cost displays
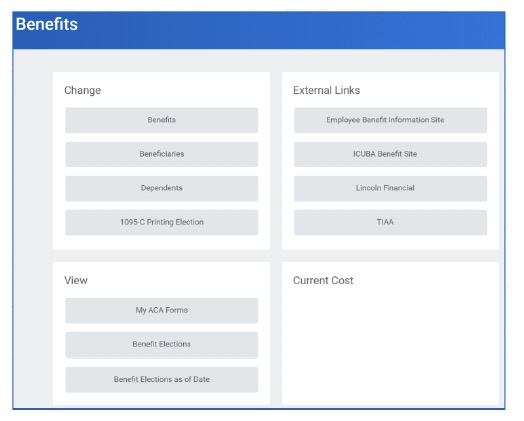
- Select Benefit Elections to view current elections
- Each Benefit will display on a separate line
- Coverage column will indicate what coverage has been elected
- Dependents columns will display covered dependents
- Employee and Employer cost per biweekly pay period will display
- These rates are based on 26 pay periods, the conversion to 20-pay elections happens in payroll
Editing Dependent Information
Overview
You can edit dependent personal information such as address, phone number, legal name, etc. This process is not to add or remove dependents from benefit plans; see Benefits - Life Event Change Benefit job aid.
Steps
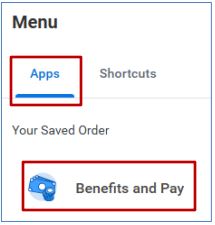
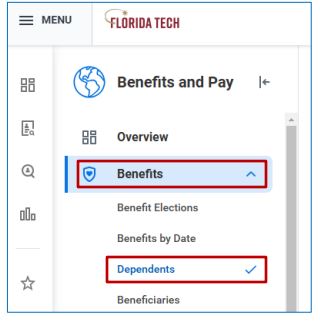
1. Navigate to the Menu at the top left corner next to the Florida Tech logo.
2. Select Apps > Benefits and Pay
3. Expand the Benefits section to select Dependents
4. Click the Edit button to the right of your dependent's information
5. The edit screen will open. Effective date and reason are required. Today's date should be used for the effective date.
6. Click Submit to save any changes made
IMPORTANT: Editing the Relationship box in this process does not add or remove a dependent from your benefits. You must follow the Benefits - Life Event Change Benefit job aid to add or remove a dependent. Example: editing a Spouse to an Ex-Spouse.
Adding a Document to your Workday Account
Overview
This feature shows you how to upload a document to your Workday account.
Type your name in the search box at the top of the site
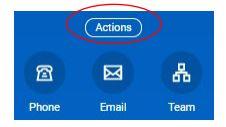
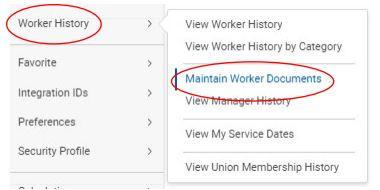
1. In the blue section click on Actions under your job title.
2. Under the Worker History section select Maintain Worker Documents
3. Click on the Add button at the top and upload your document
Benefits - Adding or removing a Dependent
Overview
This process is for Employees who have an IRS qualified life event. Changes to benefits must be made within 30 days of the life event.
Before starting this process in Workday be sure to have any required documents as they will be required as uploads during this process.
Required Document* Examples
Marriage Certificate, Divorce Decree, Insurance Coverage Effective Letter, Birth Certificate, or Insurance Coverage Effective Letter
Life Event Change Reason Details*
a. Beneficiary Change - Select this to add a new person as a beneficiary
b. Birth/Adoption/Legal Child Custody -
i. Select this to add a child to current benefits
ii. Must use the date of birth or adoption
iii. Required - Birth certificate, hospital release document, or adoption agreement must be uploaded during this step
iv. This type of Life Event must be completed within 30 days of the event
c. Divorce -
i. Select this to remove a spouse from current benefits
ii. Divorce must be finalized by the court system, using the date of divorce
iii. Required - Divorce Decree must be uploaded during this step
iv. This type of Life Event must be completed within 30 days of the event
d. Eligible Dependent Gains or Loses Coverage -
i. Select this to add or remove a dependent due to the dependent gaining or losing coverage elsewhere
ii. Must use the date the coverage began or ended
iii. Required - Letter from insurance company with effective dates must be uploaded during this step
iv. This type of Life Event must be completed within 30 days of the event
e. Employee Gains or Loses Coverage from Elsewhere -
i. Select this to add or remove yourself from benefits due to you (employee) gaining or losing coverage elsewhere
ii. Must use the date the coverage began or ended
iii. Required - Letter from insurance company with effective dates must be uploaded during this step
iv. This type of Life Event must be completed within 30 days of the event
f. Gym Membership - Select this to add, drop or change a gym membership
i. This can be done at any time of year
ii. Use today's date or a future date you cannot back date this change
g. Marriage - Select this to add or drop benefits or dependents due to a recent marriage
i. Must use the date of the marriage
ii. Required - Marriage Certificate must be uploaded during this step
iii. This type of Life Event must be completed within 30 days of the event
From Workday Main Screen
2. Select the Benefits Application, it looks like a shield
3. Select the Benefits link in the Change box
4. Select a Change Reason - *must upload document to prove life event, see list above

5. Upload attachments if your Change Reason requires documentation. Comments can be made if needed
6. Go to your Workday Inbox
7. You'll find the Change Benefit Action Item, click on Let's Get Started
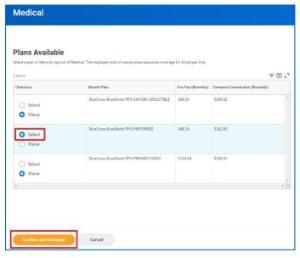
8. To add your new dependent, you'll click on Manage in the benefit you are adding them. The coverage you currently have will show up. Click Confirm and Continue
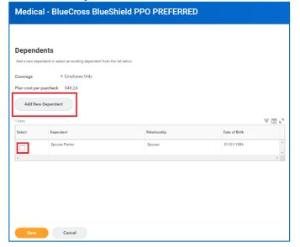
9. The Dependents screen will show up next. This is where you can add/remove a dependent to that plan. If you need to add a new dependent, you'll click Add New Dependent
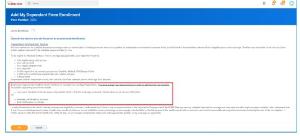
10. If you are adding a new dependent that is not already in Workday you must provide documentation proving dependency. The message below will show up and you'll need to provide one of the example documents. This can be uploaded during the final review and approval step
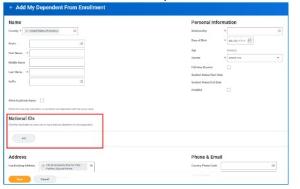
11. The required information is marked with a red star; however, Social Security Numbers are required if you are adding them to Medical, Dental, or Vision
12. Once you have added the new dependent you will see their name show up in the dependent area, check the box next to their name and save that coverage selection
13. The main screen will then show up and you'll see your plan changes in the benefit box

14. If you are adding or removing this dependent to multiple benefits, you'll need to click into each benefit to check or uncheck the box next to their name. You will not need to add their information each time as they will show up as dependent with a check box next to their name
15. Once you have made all your benefit changes click the Review and Sign at the bottom of the screen. The View Summary page will show up and you'll want to read each part of this to make sure everything is as you expect. If you need to complete an EOI, the link can be found on this page as well.

16. Before submitting your elections, if you are adding a new dependent to your benefits, you must upload the required documents*

17.After reviewing your elections, scroll down and provide your electronic signature by checking I Accept
18. Once the Submitted screen comes up you can select View Benefit Statement and from there you can save or print a copy for your records. Then select Done and congratulations you are finished!
Tuition Remission Request - Employee
Overview
This job aid will walk you through the process of submitting an Employee Tuition Remission Request. The request must be submitted before the payment deadline for each semester or term. View the Academic Calendar for the payment deadlines.
Steps
- In Workday, enter in the search bar "Create Request."
- In the Request Type field, select "All", then "Tuition Remission."
- Answer the following questions:
- What is your Employee ID? Enter your Employee ID
- Is this a degree program? Select "Yes or "No"
- Select "Graduate" or "Undergraduate"
- Have you already enrolled in the course? Select "Yes" or "No"
- If "Yes," enter the Course ID #
- What is the student's relationship to you (the employee)? Select "Self"
- Skip Student First Name, Last Name, MI, Student ID, and Student email address if request is for self
- Is this your first time requesting Tuition Remission? Select "Yes" or "No"
- What Academic year is this request for? Enter the current year in the format YYYY
- What term is this request for? Select the semester or term for this request
- Next, "Submit"
You will see an option to "Revise" your request or you may "Review Documents."
- Revise: You may make changes to your request
- Review Documents: You will check the "I agree" box after to acknowledge the following:
I have read and understood the Florida Tech Tuition Benefits Policy and agree to abide by the policy.
I agree to pay for all charges not covered by the policy and understand that the value of the benefit may be taxed or taxes withheld, as necessary, based upon applicable state and federal regulations.
Your request will go to your manager for approval, then to the Office of Human Resources, then to Financial Aid for final approval.
Tuition Remission Request - Dependents
Overview
This job aid will walk you through the process of submitting a Dependent Tuition Remission Request. The request must be submitted before the payment deadline for each semester or term. View the Academic Calendar for the payment deadlines.
Steps
- In Workday, enter in the search bar "Create Request."
- In the Request Type field, select "All" then "Tuition Remission."
- Answer the following questions:
- What is your Employee ID? Enter your Employee ID
- Is this a degree program? Select "Yes" or "No"
- Select "Graduate" or "Undergraduate"
- Have you enrolled in the course? Select "Yes" or "No"
- If "Yes," enter the Course ID #
- What is the student's relationship to you (the employee)? Select "Legal Spouse," or "Dependent Child (under the age of 26)"
- Enter the Student's First Name, Last Name, MI, Student ID, and Student email address in the subsequent 4 fields
- Is this your first time requesting Tuition Remission? Select "Yes" or "No"
- What Academic year is the request for? Enter the current year in the format of YYYY
- What term is this request for? Select the semester or term for this request
- Upload any attachments needed for dependent verification
- Next, "Submit"
You will see an option to "Revise" your request or you may "View Details."
- Revise: You may make changes to your request
- View Details: Will alert you to remind you to check whether dependent documentation is required
Next, you will see in your Workday Inbox, a "Request Process: Tuition Remission: Employee Name."
- You check the "I agree" box after you acknowledge the following:
I have read and understood the Florida Tech Tuition Benefits Policy and agree to abide by the policy.
I agree to pay for all charges not covered by the policy and understand that the value of the benefit may be taxed and taxes withheld, as necessary, based upon applicable state and federal regulations.
This request will be routed for approval to the Office of Human Resources and Financial Aid. You will receive a "Notification" in Workday with the message below once the request is submitted by the Office of Human Resources.
"Your Request for Tuition Remission for YYYY Term/Semester has been reviewed and documented and will be considered for payment once all criteria are met."
Human Resources Job Aids
Mobile App Setup
Updating TRACKS
- TRACKS username was issued when you started your employment at Florida Tech
- In most cases, ID’s are first initial and last name
- In some cases, last names may be shortened if longer than 7 letters
- It is also the beginning of the @fit.edu email address
- In most cases, ID’s are first initial and last name
- If you know TRACKS username, but forgot password:
- Log onto one of the Florida Tech applications
- Workday will work for authentication
- Click the “Forgot your TRACKS Password” below the login button
- Answer security questions
- If you forgot your answers, contact Tech Support at 321-674-7284
- Log onto one of the Florida Tech applications
- If you do not know TRACKS username or password:
- Contact Tech Support 321-674-7284
Connecting to Florida Tech Wi-Fi "eduroam"
Android Devices:
- Make sure Wi-Fi is turned on and open the Wi-Fi networks. Tap on “eduroam” to connect
- Enter TRACKS username in the Identity field followed by @fit.edu. Example: blairb2014@fit.edu
- Scroll down to the password field, type TRACKS password
- Tap “Connect”

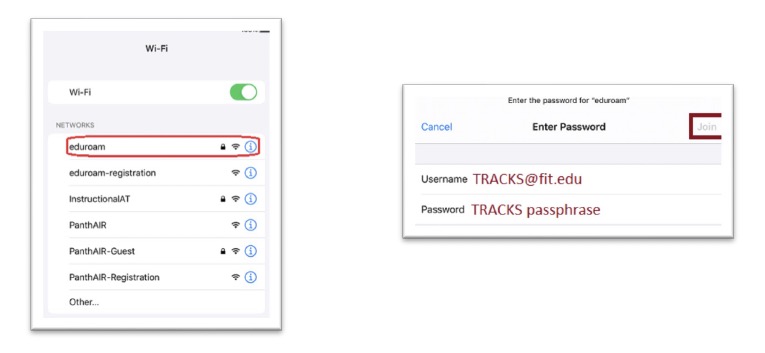
Apple Devices (iOS):
- Open Settings and choose Wi-Fi
- Enter TRACKS username followed by @fit.edu. Example: blairb2014@fit.edu. Then type TRACKS password
- Tap “Join”
Downloading the Duo Application and Workday Application
Download Duo Mobile:
- Log on to “App Store” or “Google Play Store” on wireless device
- Type Duo Mobile in the search bar
- The logo looks like this:

- Download the application
Download Workday Mobile application
- Log on to the “App Store” or Google Play Store” on wireless Device
- Type Workday in the search bar
- The logo looks like this:

- Download the application
Logging into Workday Mobile
- Locate Workday Mobile Application
- Enter the organization code “floridatech”, or scan the QR code below.
- Enter TRACKS username and password
- Click “log-in”
- Complete Duo authentication
- If first time using DUO, Click the “What is this” below the Florida Tech Logo, will bring to the Duo website with step by step instructions
- If successful, Workday Mobile Dashboard will be displayed on screen

Time Off (Absences)
Overview
All faculty and staff will be requesting time off, called absences, in Workday. This official process makes it easy for both the employee and manager to keep track of absences.
View Absence Balances
1. Select the Absence Application from the Home Page. Your available balances will display as of the current date
a. To view balances as of a future date, select Absence Balance, input desired date, and click OK
Request Absence
1. From the Absence application, select Request Absence. A calendar view will display.
2. Select the month and day(s) you wish to take time off
3. The number of days you chose will total at the bottom on the Request Absence button
4. Click that button and the 'Select Absence Type' window will pop up
a. For a time off request, such as vacation, sick, anniversary, floating holiday, etc., select Time Off and choose which type you are requesting
b. For a leave of absence request, select Leave of Absence. This type of request will route to the Leave Specialist for review and further paperwork may be needed from you
5. Click Next, review your request or make any corrections
6. Click Submit
7. Your request will route to your supervisor to approve
Tip: You can view your team's absences to help you plan your time off requests better and avoid too many workers being off at the same time. On the calendar view page, click View Teams above the calendar, then click OK. A new calendar view page will display to include your coworkers' requests
Correct Absence
Note: You cannot correct a time off request that has not been approved. You can only cancel the request.
1. From the Absence application, select Correct My Absence
2. Select the approved day(s) that you would like to correct. The 'Correct Absence' window will pop up
a. Select the day(s) to correct or click Select All
b. Change the absence type in the Type field or change the number of hours in the Quantity per Day field
3. Click Submit
4. Your request will route to your supervisor to approve
Cancel Absence
Non-approved absence request:
1. From the Absence application, select Correct My Absence
2. Select the requested day(s) that you would like to cancel
3. Click Cancel this Request
4. Review the cancellation, enter a required comment, and click Submit - No further action is needed by your supervisor
Approved absence request:
1. From the Absence application, select Correct My Absence
2. Select the requested day(s) that you would like to cancel, the the 'Correct Absence' box will pop up
3. Click the  button to remove all the desired absence instances, then click Submit
4. Your cancellation request will route to your supervisor to approve
View Absences on a Mobile Device
1. Select the Time Off application on your homepage
2. Tap the  in the top-right corner, the select Balances
3. You may view your absence balances as of the default date or select a future date
Request Absence on a Mobile Device
1. From the Time Off application, tap the month and day(s) you wish to take off
2. Tap Next and select the Type of absence you are requesting
a. Note: You cannot select a Leave of Absence on a mobile device. This type of request will need to be completed on a computer
3. Review your request or make any corrections then tap Submit button
4. Your request will route to your supervisor to approve
Correct Absence on a Mobile Device
Note: You cannot correct a time off request on a mobile device that has not been approved
1. From the Time Off application, select the approved day(s) that you would like to cancel
2. The selected day(s) will be listed at the bottom. Tap a day to correct it. Note: You can only correct one day at a time
a. Change the absence type in the Type field or change the number of hours in the Duration field
3. Tap the green Submit in the top-right corner
4. Your request will route to your supervisor to approve
Cancel Absence on a Mobile Device
Note: You cannot cancel a time off request on a mobile device that has not been approved
1. From the Time Off application, select the approved day(s) that you would like to cancel
2. The selected day(s) will be listed at the bottom. Tap a day to cancel it. Note: You can only cancel one day at a time
3. Tap the red Delete button
4. Your request will route to your supervisor to approve
Tip: You can sync your Outlook/Exchange calendar to Workday, for a complete mobile calendar experience. From the Time Off application tap the in the top-right corner, then select Settings. Choose the calendar you wish to connect, then tap the arrow in the top-left corner.
Home Address Update
- Go to Employee profile in Workday
- From related actions, go to Personal Data
- Navigate to Change Home Contact Information
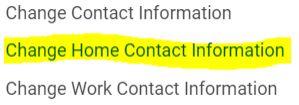
- Click in the top box and populate the effective date
- Update the home address
- Enter comment
- Click submit
Time Tracking
Overview
Hourly staff and student employees will be tracking hours worked in Workday
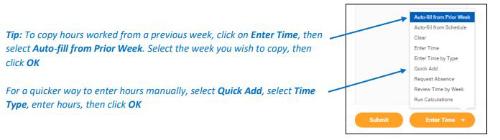
Enter Hours Worked
1. Select the Time application on your homepage
![]()
2. Select either This Week or Last Week
3. Select a day on the calendar for which you need to enter hours
a. The 'Enter Time' window will pop up. Change the Time Type as needed or leave 'Hours Worked' as the default
b. Enter the number of hours worked and click OK
c. Repeat as necessary
d. To add absence hours on the same day as hours worked, select the day on the calendar again, and follow the steps above to change the Time Type
NOTE: Workday will automatically calculate holiday hours, so you will not need to enter them manually
4. When you are finished entering hours worked, click Submit, review your time entries, click Submit again, then Done
5. Your timesheet will route your supervisor to approve
Correct Hours Worked
If you made a mistake or need to make changes to a submitted or approved timesheet, you may do so
1. From the Time application, select either This Week or Last Week
2. Select the day on the calendar for which you need to correct hours
a. The 'Enter Time' window will pop up. Change the Time Type or change the Hours, as needed
b. Click OK
c. Click Submit, review the hours entered, click Submit again, then Done
3. The changes to your timesheet will route to your supervisor to review and approve
Approval Business Process
1. The manager will receive an inbox action item to review and approve the employee's timesheet
a. If corrections need to be made, the manager can send the timesheet back to the employee
Enter Hours Worked on a Mobile Device
1. Select the Time Tracking application on your homepage
![]()
2. Select Enter Time
3. Select the day on the calendar for which you need to enter hours and tap Add New
a. Change the Time Type or leave 'Hours Worked' as default
b. Enter the number of hours worked, then tap OK in the top-right corner
c. Repeat as necessary
d. To add absence hours on the same day as hours worked, select the day on the calendar again, tap Add New and follow the steps above to change the Time Type
NOTE: Workday will automatically calculate holiday hours, so you will not need to enter them manually
4. When you are finished entering hours worked, tap Submit, review your time entries, tap Submit again
5. Your timesheet will route to your supervisor to approve
Tip: To copy hours worked from a previous week, tap Auto-fill in the top-right corner. Select the week you wish to copy, then tap Next in the top-right corner. Tap Submit, review the hours entered, then tap Submit again
Correct Hours Worked on a Mobile Device
1. Select the Time Tracking application on your homepage
2. Select Enter Time
3. Select the day on the calendar for which you need to correct hours, then select the time entry you submitted
a. Change the Time Type or change the Hours as needed
b. Tap OK in the top-right corner
4. Tap Submit button, review your time entries, tap Submit again
5. Your timesheet will route to your supervisor to approve
Approval Business Process on a Mobile Device
1. The manager will receive an inbox action item to review and approve the employee's timesheet
a. If corrections need to be made, the manager can send the timesheet back to the employee
Onboarding Status Summary - for Managers and HR Partners
Workday's Onboarding Status Summary report is a tool to review onboarding status for newly hired employees.
Report Process
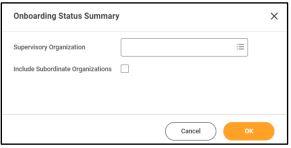
1. Search for Onboarding Status Summary
2. Enter parameters
a. Organization - selecy supervior organization(s) to review
i. Managers and HR Partners can both run the report
ii. To run for a heirarchy, the user must have access to all applicable subordinate supervisory organizations
1. Select Include Subordinate Organizations
3. Click OK to run
Results
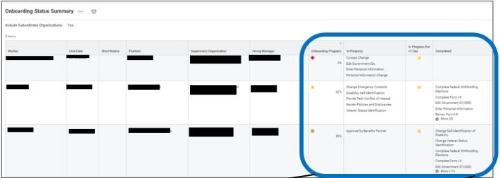
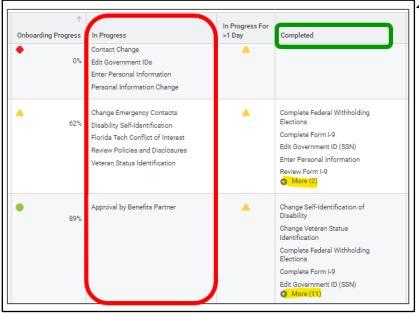
1. Onboarding Process indicates the percentage of completed tasks
2. Review In Progress and Completed tasks
a. Ensure time sensitive items are processed before training or job activity occurs
3. Tasks launch in four sets. Frequent WD inbox monitoring is recommended
a. Items returned for correction will include comments
b. A new set will appear as the previous set is successfully processed
4. Important: Sets 1 and 2 are time sensitive. Managers are to verify each new hire employee's completion of these items before training or job duties begin. The start date may be revised at the department's request if the employee has not been active in the position.
Set 1 - time sensitive
- Enter Personal Information - Includes Contact Change and Personal Information Change
- Edit Government IDs
Set 2 - time sensitive
- Complete Federal Withholding Elections
- Complete Form I-9
** Present original, unexpired Form I9 identification to Human Resources in the RA Work Building **
Set 3 - complete within 1 week of hire date
- Change Emergency Contacts
- Review Policies & Disclosures
- Disability Self-Identification
- Veteran Status Identification
- Florida Tech Conflict of Interest
Set 4
- Payment Elections
- (FT employees) Benefit Elections (hard deadline - 30 days from start date)
5. Note: After completing onboarding task Sets 1 and 2, an international student without a Social Security (SS) number is permitted to work up to 90 days as an SS card application is submitted to the SS Administration
a. The Review Form I9 task will remain pending until the assigned SS number is reported in Workday
b. Important: The student will receive the Social Security application and instructions as s/he visits HR to present the Form I9 identification
i. The document requires the manager's authorization. If the student has not provided this to the manager, s/he most likely has not presented IDs to Human Resources
Upcoming Student Employment End Dates - For Managers & HR Partners
Workday's Upcoming Student Employment End Dates report is a tool to track job end dates for GSA, College Role, and FWS student workers.
Tasks to end or revise a job must be submitted and finalized in advance.
Report Process
1. Search for Upcoming Student Employment End Dates
2. Enter parameters
a. Organization - select supervisor organization(s) to review
i. Managers and HR Partners can both run the report
ii. To run for a heirarchy, the user must have access to all applicable subordinate supervisory organizations
1. Select Include Subordinate Organizations
3. Click OK to run
Results
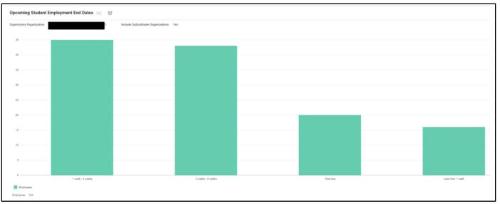
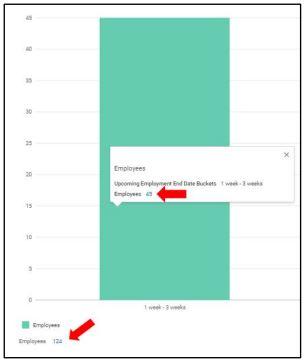
1. End Dates are listed: 1-3 weeks, 3-6 weeks, Past Due, and Less than 1 week
2. The Employees hyperlink in the lower left will access a comprehensive list
3. Or clicking a category will display an Employees hyperlink for that timeframe
4. Results may be exported to .pdf or .xl format
5. Finalize tasks to update each job before its end date
a. A Job Change/Date Change may revise an active student position's end date
b. A Termination or End Job will end the student's position and remove timesheet access
1. End Job: access student's WD profile: Actions/Job Change/End Job
a. Important: if an alert notes that student has active additional jobs, the update is a 2-step process:
1. Switch Primary Job: access student's WD profile: Actions/Job Change/Switch Primary Job
a. Once finalized, the position name for the job you manage will be followed by + (indicating it is now a secondary position)
2. End Job can be submitted successfully
a. End Job: access student's WD profile: Actions/Job Change/End Job
Important: if an hourly student's job duties continue past the end date wages will not successfully process until the job is updated in Workday.
Payroll
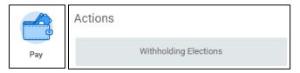
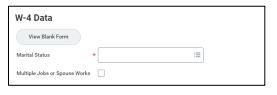
Withholding Elections
Overview
Employees can update their Federal, State, and Local elections directly in Workday. New Hires receive an inbox task as part of Onboarding to make updates. Existing employees can make changes as needed. If an election is not made, the default will still be withheld.
View Process
1. Select the Pay Application from the Home Page
2. Select Withholding to View
3. Click through Tabs to view elections for each Type
a. If no election exists, just the Update button will display

4. Click Update button to change elections
a. Confirm Company and Effective Date
b. Click OK
c. Update with new desired withholding information
5. Click OK
6. Process is Complete